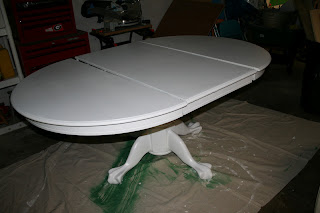
Kitchen Table Make-Over...
When my grandfather died I was left his kitchen table. It has been a great table but after 15 years of abuse from the four of us, it was looking a little rough. I wanted to get a new table but those of you who know me know that I attach to things quite easily and besides this was handed down to me. Hopefully to become a wonderful family heirloom. Now the tables that I did look at were not all that different, mostly just painted and chairs that were not broken or wobbly. So I set off on the Internet for some help on how to paint furniture that would actually look nice and not cheap or peel. I found this website which was uber-helpful. It is called Centsational Girl and coincidentally the tables are similar! This is my very first ever furniture overhaul and personally I could not be happier! Jake is building me some chairs to go along with it and I will post once they are done. Sarah is getting a big girl chair that is the same but taller. Needless to say she is over the moon about not having a 'high chair' anymore! So here is a before...
I used a medium grit cube sander to begin with and by hand got all of the edges and sides (hand cramps). I made sure all of the surfaces were smooth to the touch.
Jake cut me two strips of wood and put a ridge in it to match the rest of the table so that the water damage did not show. I sanded this really well too. I attached it with Liquid Nails and left the clamps on about 24 hours to make sure that it stayed in place.
I used an orbital sander to get the top super-smooth (and some of the edges). Without this, I have no idea how long this would have taken me!
 |
| All sanded and wiped down with a damp rag, then a dry one. I wanted to remove ALL dust particles before applying the primer. |
I moved to the basement for priming and painting. The pollen and dust here are so bad I did NOT want goopy yucky paint so it was good to move down there except you HAVE to ventilate (and I wore a mask)! This primer was rough! It is oil based and smells!! I primed the whole table twice, letting it COMPLETELY dry between each coat. I used an uber cheap paint brush and just tossed it. I also tossed the paint roller...no since wasting that much time cleaning up oil based primer....YUK!
 |
| I used Behr Enamel Hi-Gloss Ultra White paint (water-based). I rolled the top and used a brush on the sides and bottom. |
I used a really good paint brush (Purdy...and I washed this one out and kept it!) for this part..I did not want hairs left behind or lots of paint strokes. I let each coat dry a ridiculously long amount of time...I am talking days. I wanted the paint to harden completely. A lady at the hardware store told me that paint dries from the inside out so I wanted to make sure that it was good and dry. This is something that we use daily and then some! I want it to stay pretty and last!
I added 3 coats of clear wax. I rubbed it on with a pad and let it dry an hour, then buffed it with an old soft cotton washcloth. I repeated three times but I only waxed the top. I hope that this helps it protect the top since it is the most used of all! (I was told by several people that if you use a polyurethane on white paint that it would yellow it, so hopefully this clear wax will not!)
I think that it turned out GREAT (course I am biased)! I found my pitcher at an antique store for a great price and added some wonderful flowers. Now all we need are chairs and they are on the way! I love my new table and I have to say I am glad that I tackled this project and I am so happy with the results!
Let me know what you think!


Comments
Post a Comment